![]()
![]()
Chapter 3
Configuring Oracle for AccessOracle is a sophisticated DBMS that manages access to almost any size database that you can imagine. Hundreds, thousands, or even tens of thousands of concurrent users can connect to a single database server, locally or across a computer network, To accomplish these extraordinary tasks efficiently and reliably, Oracle creates and uses numerous software structures. This chapter explains these structures, including:
Database servers and instances
Oracle server processes and threads
Nets, Oracle's networking software for distributed processing environmentsOracle Database Instances
As you learned in Chapter 1, a database instance is the collection of server-side processes and memory areas that Oracle uses for managing access to a database. Figure 3-1 is a basic illustration that shows you the shape of an Oracle database instance's processes and memory areas.NOTE
Chapter 12 provides more information about the memory structures in an Oracle instance.
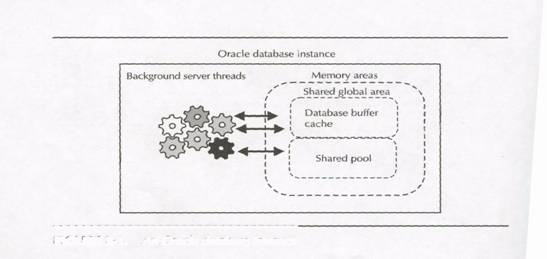
FIGURE 3-1. An Oracle database instance
Server Startup and Shutdown
Before anyone can work with an Oracle database, someone must start up the database server. This process includes starting a database instance, mounting (associating) the database to the instance, and opening the database. After a server startup, the database is generally available for use with applications.
Conversely, you can make a database unavailable by performing a database server shutdown. A server shutdown is the reverse of a server startup: you close the database, dismount it from the instance, and then shut down the instance. After a server shutdown, users cannot access the database until after you restart the server.Server Crashes
A server crash is an abnormal server shutdown. For example, an unfortunate operating system operation or problem could unexpectedly kill one or more of a server's background processes. Consequently, the database server might crash. Oracle has built-in features that protect the work of all committed transactions, and automatically performs the necessary recovery from an instance that crashes. See Chapter 11 for more information about Oracle's database protection mechanisms.Oracle's Parallel Server Option and High Availability
Many sites use Oracle to support mission critical applications. A mission-critical application, by definition, has stringent high-availability requirements. Such sites can tolerate little or no downtime due to a server crash. In such circumstances, Oracle's Parallel Server option can help.
In a parallel server configuration, multiple database instances, running on different nodes of a loosely coupled computer, mount and open the same Oracle database in parallel. Users can work with the database through any instance that is mounted to the database. If an isolated system failure causes one of the instances to crash, other servers remain available so that users can continue work uninterrupted. This book does not discuss Oracle's Parallel Server option in any detail, but mentions this option in the context of certain discussions.Controlling Server Startup and Shutdown
Now that you have a basic understanding of database availability, the following exercises teach you how to check the status of and control the availability of Oracle on Windows NT.EXERCISE 3.1: Checking the Status of Oracle on Windows NT
On Windows NT, an Oracle database instance is an NT service. The default installation of Oracle automatically configures a database instance as an NT service that starts up when you start Windows NT. One way to start and stop the
database instance on your Windows NT server or workstation is to use the Windows NT Services dialog box.
To check the current status of the Oracle service on your computer, complete the following steps.1. Click the Start button on the Windows NT taskbar.
2. Click Settings.
3. Click Control Panel.
4. Double-click Services to display the Services dialog box.The Services dialog box, shown in Figure 3-2, includes a scrollable list of all the services installed on your computer, as well as their current status (for example, Started), and their Startup configuration (such as Manual, Automatic, or Disabled).
The service that corresponds to the database instance on your machine is the service with the name OracleServicename, where name is the SID you chose for the starter database during the installation process. If you completed the steps in Chapter 2 exactly as given, your OracleServicename should appear exactly as in Figure 3-2.
If the current status of OracleServicename is Started, then an Oracle instance is available to provide access to the starter database on your computer. However, if the current status of OracleServicename appears as null (as a blank space),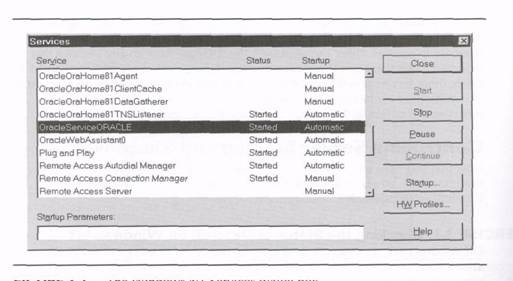
FIGURE 3-2. The Windows NT Services dialog boxan instance is not running and the starter database is not accessible.
EXERCISE 3.2: Manually Starting Oracle
When OracleServicename is not running, you can start up an instance and make the starter database available for access by completing the following steps with the Windows NT Services dialog box.1. Select the service OracleServicename.
2. Click the Start button.After Windows NT starts the service, the status of OracleServicename should change to Started, which means that an instance is now started and mounted to the starter database, and the database is open for user access.
NOTE
You can also start up an Oracle instance and mount and open the database by using the STARTUP command of SQL*Plus. See your Oracle documentation for more information about this SQL*Plus command, as well as Chapter 11 for several examples of using the STARTUP command.EXERCISE 3.3: Manually Stopping Oracle
The process of database shutdown is similar to server startup. When OracleServicename is started, you can shut down the instance and make the starter database unavailable by completing the following steps with the Windows NT
Services dialog box.1. Select the service OracleServicename.
2. Click the Stop button.NOTE
You can also shut down an Oracle database server using the SHUTDOWN command of SQL*Plus. See your Oracle documentation for more information about this SQL*Plus command, as well as Chapter 11 for several examples of using the SHUTDOWN command.EXERCISE 3.4: Configuring Oracle for Automatic Startup
You can also configure Windows NT to automatically start the Oracle database service when Windows NT starts. To do this, complete the following steps with the Windows NT Services dialog box.1. Select the service OracleServicename.
2. Click the Startup button.
3. Select Automatic in the Startup Type options list of the Service dialog box, and then click OK.When you return to the Services dialog box, the Startup field of the OracleServicename service should now be Automatic. The next time that you restart Windows NT, the operating system will automatically start the Oracle service so that users can access the starter database.
NOTE
By default, the installer configures OracleServicename for automatic startup with Windows NT.Connecting to Oracle
After an Oracle instance is up and running, you can establish a connection to the server and perform database work. Behind the scenes, the mechanisms of the database instance work to complete your requests and the requests of others. At the same time, the database instance automatically protects the work of all transactions while preserving the integrity of the shared database. The next two exercises show you how to connect to and disconnect from Oracle using SQL*Plus.EXERCISE 3.5: Connecting to Oracle with SQL*Plus
Once you have the Oracle service started on your Windows NT workstation or server, you can connect to the instance and access the starter database. To start SQL*Plus and establish a new database session, complete the following steps:1. Click the Start button on the Windows NT taskbar.
2. Click Programs.
3. Click Oracle - Ora81Home.
4. Click Application Development. .
5. Click SQL Plus.After SQL*Plus starts, it automatically presents its Log On dialog box, which you can use to enter a username and password to connect to the starter database, as shown in Figure 3-3.
At this point, you can use the following information to establish your first Oracle
database session:
Enter SYSTEM in the User Name field.
Enter MANAGER in the Password field.
Enter the name of your starter database in the Host String field. If you followed the steps in Chapter 2, you can enter ORACLE
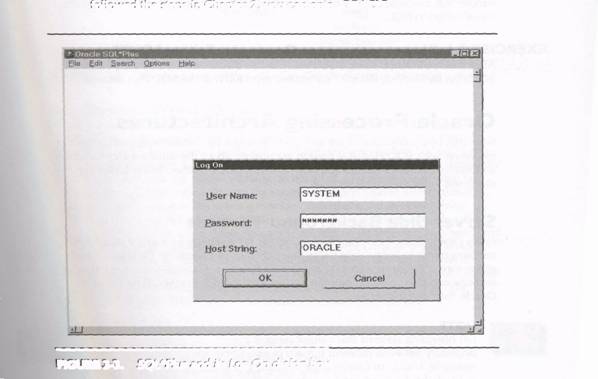
FIGURE 3-3. SQL*Plus and its Log On dialog box
.If everything works properly, SQL*Plus will start and display a message similar to the following:
SQL*Plus: Release 8.1.5.0.0 - Production on xxx xxx xx xx:xx:xx xxxx
(c) Copyright 1999 Oracle Corporation. All rights reserved.
Connected to:
Oracle8i Enterprise Edition Release 8.1.5.0.0 - Production
With the Partitioning and Java options
PL/SQL Release 8.1.5.0.0 - ProductionSQL>
The blinking cursor after the "SQL>" in the last line of the display is SQL*Plus's default command prompt. Here, you can interactively type SQL and SQL*Plus commands to perform work. Later on in this chapter, you'll see how to enter some simple SQL commands. The next chapter will provide you with a more thorough introduction to SQL.
EXERCISE 3.6: Disconnecting from Oracle and Exiting SQL* Pl us
After you are finished using SQL*Plus, you can disconnect from Oracle and exit SQL*Plus by entering the EXIT command (type EXIT) at the SQL*Plus prompt.Oracle Processing Architectures
Now that you know how to get an Oracle instance up and running and connect to the server with SQL*Plus, it is time to learn more about the software architecture of an Oracle database instance and how to investigate it further. These topics are discussed in the following sections.Server-Side Background Threads
Every Oracle database instance on Windows NT executes as a single process that contains multiple lightweight background threads of execution. Each background server thread performs a specialized system function. Figure 3-4 and the following sections explain the most common background threads that you'll find in any Oracle database instance.NOTE
On operating systems that cannot support the boundary between different threads of execution (for example, Unix), an Oracle instance starts and uses multiple background server processes rather than a single process with multiple threads of execution.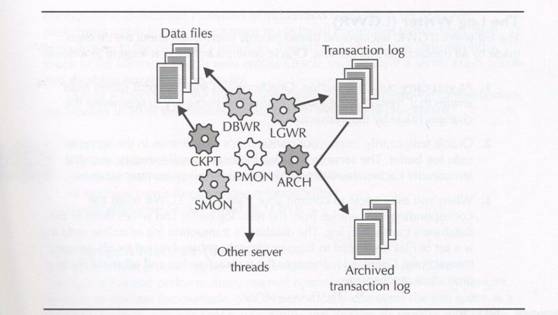
FIGURE 3-4. The background threads of an Oracle database instance
The Database Writer (DBWn)
When you modify some database data (for example, insert, update, or delete a row in a database table), Oracle does not simply modify the data on disk. This type of processing would be extremely inefficient in a large multiuser system because the system would constantly be reading data from and writing data back to the database's data files. Instead, a server thread working on behalf of your session reads one or more data blocks from a data file into the server's memory. Oracle then makes the change that you request in the server's memory. Eventually, the database writer (DBWR) background thread writes modified data blocks from memory back to the database's data files. To consolidate disk accesses, reduce unnecessary overhead, and make Oracle perform optimally, an instance's DBWR writes modified data blocks from memory to disk only in certain situations: when DBWR sits idle for several seconds, when a user thread wants to read a new data block into memory but no free space is available, or when the system performs a checkpoint. The section "The Checkpoint Thread (CKPT)," later in the chapter, explains checkpoints.NOTE
Every Oracle instance has at least one DBWR thread. Systems that must support high-volume transaction throughput can operate better with two or more DBWR threads (DBWO, DBW1, DBW2, and so on).The Log Writer (LGWR)
The log writer (LGWR) background thread records information about the changes made by all transactions that commit. Oracle performs transaction logging as follows:1. As you carry out a transaction, Oracle creates small records called redo entries that contain just enough information necessary to regenerate the changes made by the transaction.
2. Oracle temporarily stores your transaction's redo entries in the server's redo log buffer. The server's redo log buffer is a small memory area that temporarily caches transaction redo entries for all system transactions.
3. When you ask Oracle to commit your transaction, LGWR reads the
corresponding redo entries from the redo log buffer and writes them to the database's transaction log. The database's transaction log or online redo log is a set of files dedicated to logging the redo entries created by all system transactions. Chapter 11 discusses the transaction log and other database protection mechanisms.NOTE
Oracle does not consider a transaction to be committed until LGWR successfully writes your transaction's redo entries and a commit record to the transaction log.The Archiver (ARCH)
The archiver (ARCH] background thread automatically backs up the transaction log files after LGWR fills them with redo entries. The sequential set of archived transaction log files that ARCH creates is collectively called the database's archived transaction log or offline redo log. If a database experiences a serious failure (for example, a disk failure), Oracle uses the database backups and the archived transaction log to recover the database and all committed transactions. Chapter 11 explains more about Oracle's protective mechanisms, including database backups and the archived transaction log.NOTE
Automatic transaction log archiving is an optional feature of Oracle. Therefore, ARCH is present only when you use this feature.The Checkpoint Thread (CKPT)
Periodically, DBWR performs a checkpoint. During a checkpoint, DBWR writes all modified data blocks in memory back to the database's data files. The purpose of a
checkpoint is to establish mileposts of transaction consistency on disk. After performing a checkpoint, the changes made by all committed transactions have been written to the database's data files. Therefore, a checkpoint indicates how much of the transaction log's redo entries Oracle must apply if a server crash occurs and database recovery is necessary.
During a checkpoint, the special checkpoint (CKPT) background thread updates the headers in all of the database's data files to indicate the checkpoint.NOTE
CKPT is always present in an Oracle instance. However, with earlier releases of Oracle, CKPT was an optional server thread whose responsibilities would otherwise be performed by LGWR.The System Monitor (SMON)
During database processing, an Oracle instance's system monitor (SMON) background thread performs many internal operations, some of which you might never even realize. For example, SMON periodically coalesces the free space in a database for more efficient space allocations. SMON does its work quietly in the background during times of low activity, or when certain operations are required.The Process Monitor (PMON)
Occasionally, user connections do not end gracefully. For example, a network error might unexpectedly disconnect your database session before you can disconnect from Oracle. An instance's process monitor (PMON) background thread notices when user connections have been broken. PMON cleans up after orphaned connections by rolling back a dead session's transaction and releasing any of the session's resources that might otherwise block other users from performing database work.The Recoverer (RECO)
Oracle can support distributed database systems and distributed transactions. A distributed database is a collection of individual databases that appears to applications and end users as a single database. A distributed transaction is a transaction that updates the data in multiple databases. To protect the integrity of data throughout a distributed database, Oracle has special transaction-protection mechanisms that ensure a consistent outcome (commit or rollback) of a distributed transaction at all participating sites.
For example, an untimely network failure might interrupt the commit of a distributed transaction. In this case, the outcome of the transaction might be complete at some databases, while being left in doubt at others. To automatically resolve in-doubt distributed transactions, every Oracle instance has a recoverer (RECO) background thread. RECO automatically wakes up to resolve all in-doubt distributed transactions as they happen. RECO resolves the local outcome of an in-doubt distributed transaction so that it matches the outcome of the transaction at other nodes.NOTE
This book does not discuss Oracle's distributed database features in any detail, because multiple database configurations are necessary to test and perform most distributed database operations.Job Queue (SNPn) and Advanced Queue Time Managers (QMNn)
Oracle also supports two different job queue facilities. A job is a task or operation that Oracle executes asynchronously at a scheduled time. Database applications can use either Oracle's job queue facility, or its advanced queuing (AQ) facility to create and schedule jobs that carry out work. To run scheduled jobs, Oracle database instances can start one or more job queue (SNPn) background threads. To support jobs scheduled with the advanced queuing facility, an Oracle instance can start one or more advanced queue manager (QMNn) background threads.EXERCISE 3.7: Checking the Status of Background Threads
After connecting to the starter database using the steps in Exercise 3.5, use SQL*Plus to submit the following SELECT statement to display the background threads currently at work in your Oracle instance.SELECT name, description
FROM VSBGPROCESS
WHERE paddr <> '00';NOTE
Don't concentrate on understanding the specifics of the SQL commands used in the practice exercises for this chapter. Instead, focus on the output produced by each command. The next chapter teaches you the basics of SQL.The results of your query should look something like the following output:
NAME DESCRIPTION
-------- ------------------
PMON process cleanup
DBWO db writer process 0
LGWR Redo etc.
CKPT checkpoint
SMOH System Monitor Process
RECO distributed recovery
SNPO Job Queue Process 0
SNP1 Job Queue Process 18 rows selected.
Notice that the SELECT statement reveals the name and description of all background threads that have a process address (PADDR) not equal to "00." In the preceding results, the instance has the following background threads: PMON, DBWO, LGWR, CKPT, SMON, RECO, SNPO, and SNP1.
Threads That Support User Connections
An Oracle instance creates and uses a separate set of threads (or processes on Unix) to support database user sessions that connect to the server. Oracle can support user connections to an Oracle instance in any type of computing environment. For example, Oracle can support users that connect to an Oracle database server across a network using a PC or network computer. Oracle can also support users that start a host session and connect to an Oracle instance on the same computer. The following sections explain the different processing architectures that Oracle uses to support user connections in different types of computing environments.Client/Server Process Architectures
A client/server application is another name for a distributed processing application. In a distributed processing application, the tasks performed by the application are "distributed" across two or more distinct processing components. In a client/server application, there are three componentsthe client, the server, and a network that connects the client and the server. Figure 3-5 illustrates a typical client/server configuration.
The following sections explain each component of a client/server system.The Client
The client is the front end of the application that you use to perform work. The client is typically in charge of the following types of operations:
Presenting a user interface with which you can interact, such as a form for data entry
Validating data entry, such as checking that you enter a valid date in a
date field
Requesting information from a database server, such as customer records or sales orders
Processing information returned from a database server, such as filling a form with data, calculating field totals on a report, or creating graphs and charts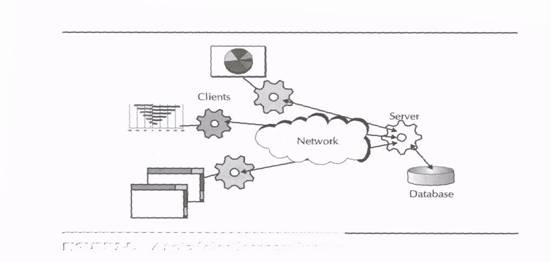
FIGURE 3-5. A typical client/server configurationThe Server
The server is the back end of the application. Behind the scenes, a database server works to manage a database among all the users and applications that use it to store and retrieve data. The server is responsible for the following operations: Opening a database and making it accessible to applications
Preventing unauthorized database access by having tight security controls
Preventing destructive interference among concurrent transactions accessing the same data sets
Protecting a database with bulletproof database backup and recovery features
Maintaining data integrity and consistency as many users perform workThe Network
Typically, the client and server components of an application execute on different computers that communicate with each other across a network. In order to converse, the clients and servers in a network must all employ communication software that lets them speak the same lingo. Later in this chapter, you'll learn more about Oracle's Net8, the networking software that lets clients and servers communicate in an Oracle client/server network.Oracle-Specific Processing Architectures
Now that you have a general understanding of distributed processing, let's take a look at the specific processing architectures that Oracle uses to support client connections.Dedicated Servers
The simplest architecture that Oracle can use to support client connections is the dedicated server architecture. Figure 3-6 shows a dedicated server architecture.
In a dedicated server configuration, Oracle starts a dedicated foreground server thread for each client that connects to the instance. A client's foreground server thread performs database work for its client only. For example, when you send an UPDATE statement to Oracle, your foreground server thread checks server memory for the necessary data blocks; if they are not already in memory, your server thread reads the blocks from disk into server memory; finally, your server thread updates the data blocks in server memory.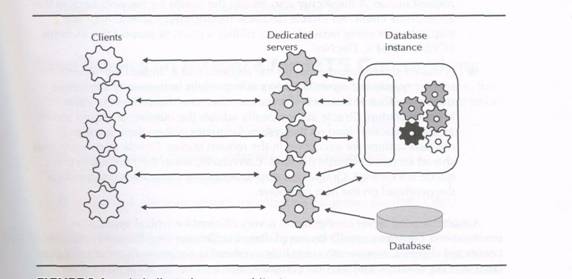
FIGURE 3-6. A dedicated server architectureThe dedicated server configuration is not particularly efficient for large user populations. That's because each dedicated server thread performs work for only one user session. If a dedicated server thread sits idle a large percentage of the time (for example, as a salesperson talks to a customer and fills out a form), the inactive server thread unnecessarily consumes server resources. Multiply this by hundreds or thousands of users, and the threads necessary to support user connections quickly deplete a server's resources. Considering these drawbacks, dedicated server connections are typically used only for intensive batch operations that keep the server thread busy a large percentage of the time. Dedicated server connections are also required to execute certain administrative tasks (for example, server startup, shutdown, and database recovery). Instead, most client/server configurations use a multithreaded server configuration.
NOTE
When you read your Oracle documentation or other books about Oracle, you might also see the terms two-task client and shadow process. These terms are synonyms for the terms dedicated server architecture and foreground server thread (or process), respectively.Multithreaded Servers (MTS)
Beginning in Oracle9i, the multi-threaded server architecture is called shared server architecture.
The typical process architecture that Oracle uses to support client connections is the multithreaded server (MTS} architecture. Figure 3-7 illustrates a multithreaded server configuration.
A multithreaded server configuration is a small collection of server side threads that, together, can efficiently support large user populations. The components in a multithreaded server configuration include dispatchers, shared servers, and queues. A dispatcher thread receives client requests and places them in the server's request queue. A dispatcher also returns the results for requests back to the appropriate client. An Oracle database instance must start at least one dispatcher for every network protocol that it plans to support (for example, TCP/IP, 1PX/SPX, decent).
A shared server thread executes the requests that it finds in the server's request queue and returns corresponding results to the server's response queue. An Oracle instance can start one or more shared servers. After instance startup, Oracle automatically adjusts the number of shared servers as the transaction load on the system fluctuates. When there are many requests waiting for execution in the request queue, Oracle starts additional shared servers to handle the load. Conversely, when the requests in the queue are cleared, Oracle can stop unnecessary shared servers to reduce the overhead on the host computer.A multithreaded server configuration is very efficient for typical application environments because a small number of shared servers perform the work for many connected clients. Consequently, very little overhead is necessary in order to support large user populations, and the host computer running Oracle can perform better.
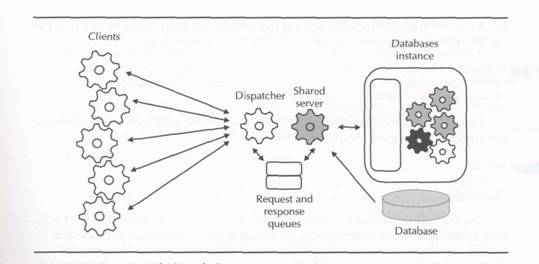
FIGURE 3-7. A multithreaded server (MTS) architectureNOTE
MTS connections are not possible unless you specifically configure an instance with the necessary threads (a dispatcher and one shared server). Subsequent sections of this chapter explain how to configure MTS for an instance.Configuring an Instance for MTS Connections
Now that you have a good understanding of Oracle's processing architectures, the following hands-on exercises teach you how to perform the following related tasks: Check your current type of connection
Configure your database instance for MTS connections
Test that an MTS configuration is working properly
View and edit your server's initialization parameter file (INIT.ORA)EXERCISE 3.8: Checking Your Current Type of Connection
Now that you understand the different types of user connections that are possible, let's investigate what type of connection you are currently using. After you connect to Oracle using SQL*Plus with the steps in Exercise 3.5, enter the following query to list the type of connection you currently have to the starter database.SELECT server
FROM v$session
WHERE audsid = USERENV('SESSIONID');Unless you have done some prior configuration work with your starter database, the output of your query should be as follows:
SERVER
--------
DEDICATEDThe example output for this query indicates that the current connection to Oracle uses a dedicated server configuration. A dedicated server connection is the default type of client/server (two-task) connection if you install Oracle for Windows NT using the Typical installation option. The next section shows how to configure an instance so that MTS connections are the default type of client/server connection.
EXERCISE 3.9: Configuring Your Instance for MTS Connections
When you install Oracle for Windows NT using the Typical installation option, the installer does not configure the starter database's instance with the dispatcher that client/server connections use to establish MTS connections. To support MTS connections, you need to make some configuration changes to your instance. For this exercise, you will use the Database Configuration Assistant, a graphical user interface that makes this job easy. To start the Database Configuration Assistant, complete the following steps:1. Establish a Windows NT session using an account that is a member of the
Administrators group.
2. Click the Start button on the Windows NT taskbar.
3. Click Programs.
4. Click Oracle - Ora81Home.
5. Click Database Administration.
6. Click Database Configuration Assistant.The Database Configuration Assistant is essentially a wizard that makes it easy to complete certain database configuration tasks. In this case, use the following steps to configure an instance to accept MTS connections:
1. On the first page, click Modify Database, and then click Next.
2. On the second page, enter the password for the INTERNAL account for your Oracle database service, and then click Next. The default password for INTERNAL after installation is ORACLE.
3. On the third page (which might take a few seconds to display, because the tool establishes a database connection), select Shared Server Mode, as shown in Figure 3-8, and then click Next.
4. Skip the fourth page by clicking Next. ,
5. On the fifth page, you configure the dispatcher(s) for a given network protocol. In this exercise, the default values are sufficient to configure one dispatcher for the TCP/IP network protocol. Click Next to continue.
6. On the sixth page, you can set minimum and maximum settings for your instance's MTS configuration. These settings include the maximum number of dispatchers that can be started, the initial number of shared servers to start during instance startup, and the maximum number of shared servers to allow at any given time. For the purposes of this exercise, simply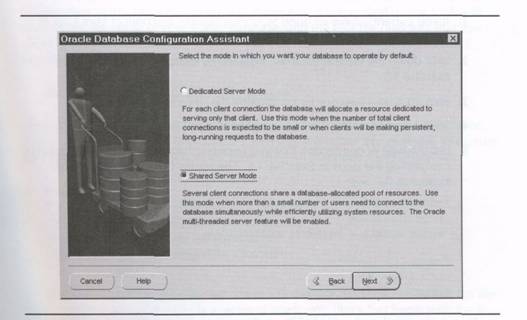
FIGURE 3-8. The Database Configuration Assistant lets you configure an instance for shared server (MTS) connectionsaccept the defaults and click Finish.
7. At this point, the Database Configuration Assistant prompts you for the location of your instance's local initialization file (server parameter file or server configuration file). To accept the default file, click OK.NOTE
You'll learn more about initialization files in Exercise 3.11 in this chapter.After you complete the preceding steps, the Database Configuration Assistant makes the necessary changes to your database's initialization file and then closes itself.
EXERCISE 3.10: Testing Your New MTS Configuration
You will not see the effects of your configuration changes in Exercise 3.9 until you restart your server and reconnect to the starter database. To see the results of your labor, complete the following steps:1. If you currently have an open SQL*Plus session, disconnect from Oracle and exit SQL*Plus by completing the steps in Exercise 3.6.
2. Shut down the current database instance by completing the steps in Exercise 3.3.
3. Start up a new instance by completing the steps in Exercise 3.2.
4. Start a new SQL*Plus session using the steps in Exercise 3.5.
5. List the type of connection that you currently have to the starter database by completing the steps in Exercise 3.8. The results from the query should appear as follows:SELECT server
FROM v$session
WHERE audsid = USERENV('SESSIONID');
SERVER
----------
SHAREDIf your server is listed as SHARED, you've successfully configured your instance so that client/server (two-task) connections automatically use the instance's MTS processing architecture. The practise exercise that follows explains more about the underlying details of your work, and more about the MTS configuration of your instance.
EXERCISE 3.11: Investigating Your Database's Initialization File
As mentioned in Exercise 3.9, the Database Configuration Assistant makes modifications to your server's initialization file. Much like the win.ini file for older versions of Microsoft Windows, an initialization file is a configuration file for an Oracle database instance. A server's initialization file is essentially the list of parameters. You can add, delete, and adjust the settings for various instance parameters to configure and tune the operation of an Oracle database before starting a new instance for the database.NOTE
There are a couple of synonyms for the term initialization file that you should be familiar with, including the terms init.ora file and parameter file.The installer automatically creates an initialization file for your starter database. The location of this file depends on two things that you specified during Oracle installation: the name of your starter database, and the root file directory that you chose as the file destination. Assuming that you followed the steps in Chapter 2 exactly, the initialization file for your database should be
drive:\Oracle\Admin\Oracle\pfile\init.ora
where drive is the disk designation that you chose for your Oracle installation. You can open and edit this file manually with any text editor. For example, to explore the current parameters in your server's initialization file, open it with Notepad.
NOTE
If you have experience with previous versions of Oracle on Windows NT, you will notice that the default location of the started database's initialization file has changed for Oracle.Once you open the initialization file in a text editor, you will notice that the file header (the top part of the file) is a series of comments (lines that begin with the # symbol) that explain the purpose of the file. Following the file header are the parameters and related comments of each parameter. The parameter names in init.ora are not case-sensitiveyou can specify them using any case of letters. Two basic parameters to look for and examine are the following:
The DB__NAME parameter indicates the name of the database that you plan to mount to the instance. If you do not set the parameter correctly, Oracle will not be able to start the instance or open the database. Your starter database's DB_NAME is most likely oracle.
The DB_DOMAIN parameter indicates the second half of your database's name by indicating the network domain that encompasses the location of the database. For example, the starter database on the test computer at my company, Animated Learning, is located in the animatedlearning.com network domain. Therefore, DB_DOMAIN is set to animatedlearning.com, and the started database's complete global name is oracle.animatedlearning.com.Subsequent chapters of this book explain several other parameters that you can adjust to configure and tune Oracle's operation. For the remainder of this exercise, let's focus on the parameters that the Database Configuration Assistant added when we configured Oracle to accept MTS connections in Exercise 3.9.
.
NOTE
Oracle has more than 200 documented parameters (and many other undocumented parameters) that you can explicitly specify in an initialization file. Even when an initialization file doesn't include a specific parameter, Oracle uses the parameter's default value. When a parameter file explicitly specifies a parameter, the setting for the parameter overrides the default parameter value that is embedded within the Oracle software. For a complete description of all Oracle initialization parameters and their default values, see the Oracle Reference, which is part of your Oracle online documentation set.At the very end of the initialization file should be the following sequence of parameters:
nts_dispatchers = "(protocol=TCP)(DISP=1)(mul=OFF)(pool=OFF)"
mts_max_dispatchers = 5
mts_servers = 1
mts_max_servers = 20The items in the following list briefly describe the purpose of each MTS parameter:
The MTS_DISPATCHERS parameter is a string that specifies how many dispatchers should start for a given network protocol. Because you chose the default settings in Exercise 3.9, there is just one specification of the MTSJDISPATCHERS parameter that establishes one dispatcher (DISP=1} for the TCP/IP network protocol (PROTOCOL=TCP), with multiplexing disabled (MUL=OFF) and connection pooling disabled (POOL=OFF). You'll learn more about the multiplexing and connection pooling features of Net8 later in this chapter.
The MTS_MAX_DISPATCHERS parameter limits the total number of dispatchers that Oracle can start. When an Oracle database must service many MTS user connections for a network protocol, you can start several dispatchers for the protocol to obtain more efficient response times for users.
The MTS_SERVERS parameter determines the initial number of shared servers that will be created during instance startup, as well as the minimum number of shared servers possible in the MTS configuration. When you expect many concurrent database requests via MTS connections, you can improve response times by increasing the value of MTS_SERVERS.
The MTS__MAX_SERVERS parameter limits how many shared servers an MTS can start. The setting for MTS_MAX_SERVERS prevents Oracle from starting too many shared servers during times of peak demand.As you become more familiar with server parameters and initialization files, you might find it more efficient to edit initialization files manually with a text editor, such as Notepad, rather than use tools that edit the file, such as the Database Configuration Assistant.
To complete this exercise, close the init.ora file without saving any changes, and then exit your text editor.Oracle Networking and Net8
Computer applications typically operate using a client/server system that incorporates a network of computers. To transmit data between the clients and servers in your Oracle environment, you must use Oracle's network communication software. Nets, known as SQL*Net in previous versions of Oracle, is networking software that makes it possible for Oracle clients and servers to communicate across a network. Executing on both the clients and servers of the system, Net8 makes the presence of the network in a client/server system transparentan application developer does not have to code low-level application logic (for example, network protocol calls) to access Oracle data across a network. Instead, a client application uses standard SQL statements to request data from a remote Oracle server as if the database were on the same machine as the client. The following sections explain the fundamental concepts of Nets.Basic Net8 Architecture
The Net8 software that executes on both clients and servers in an Oracle network includes several different layers of functionality that work to hide the complexities of network communication in a distributed processing application. On the client side, Net8 permits an application to locate and access a remote database using SQL as if the database resided on the same computer. On the server side, Net8 permits the database server to receive and send data in response to client SQL requests as though the client were running on the same machine as the server.
The Transparent Network Substrate (TNS) layer of Net8 is software that provides Oracle clients and servers with a common application programming interface (API) to all industry-standard network protocols. By plugging network protocol adapters into TNS, clients and servers can communicate using any network protocol. NetS supports all common network protocols, including TCP/IP, IPX/SPX, DecNet, LU6.2, and more.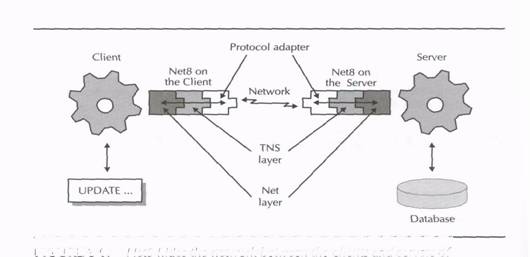
FIGURE 3-9. Net8 hides the network between the clients and servers of an applicationFigure 3-9 illustrates a network communication via NetS between a client application and an Oracle database server. When a client application executes a SQL statement, the statement passes through each layer of NetS running on the client, which packages the request and sends it across the network. At the server end, Net8 opens the network package, passes the request through the various Net8 layers in reverse order, and finally feeds the SQL statement to the database server as though it were issued by a local application. After statement processing, the server returns the results in the reverse order through Net8 and the network, back to the client.
TNS Connections
A TNS connection is a communication pathway between two nodes in an Oracle network. A TNS connection is a persistent pathway that transmits data between two TNS components. In every TNS connection, one node is the initiator and the other is the destination. Typically, the initiator of a TNS connection is a client application, and the destination is an Oracle database server. However, servers can also communicate with one another in an Oracle distributed database system using TNS connections. This book does not discuss distributed database systems in any detail.Connection Pooling
Typical database connections support applications that sit idle a large percentage of the time. For example, when using a typical order-entry application, the salesperson does not actually send or receive any database information across the TNS connection while filling out a screen form with order information.
To limit the number of physical network connections and make more efficient use of network resources, Net8 can pool a preset number of TNS connections. With connection pooling, a database session that sits idle can temporarily allow another session to use its physical TNS connection to the database server, and later reclaim its connection when the session needs to communicate with the server. Consequently, connection pooling allows many sessions to communicate with a database server by sharing a predetermined number of available TNS connections. Fewer network resources are needed to support typical applications, and less server overhead typically translates to better server performance. Figure 3-10 illustrates the basics of connection pooling.
The server does not begin pooling TNS connections until after the preset number of physical network connections are open. To open a subsequent TNS connection, the database server must first locate an idle session and then logically reassign the idle session's connection to the new connection. The preset limit of physical network connections is a limit that you can set as a configuration parameter before server startup.Multiplexing
To further reduce the overhead of systems that must support many network connections, Net8 can multiplex many network connections into a single physical network transport. Figure 3-11 illustrates Net8 multiplexing.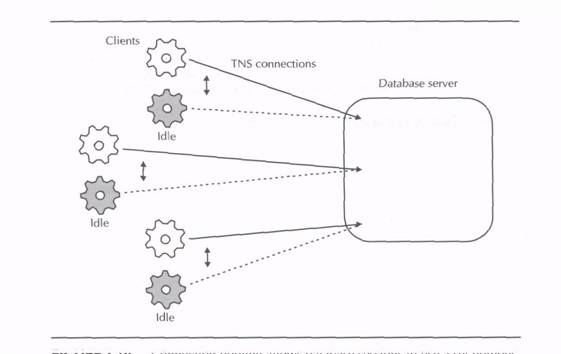
FIGURE 3-10. Connection pooling allows database sessions to use a set number of physical TNS connections and reduce network overhead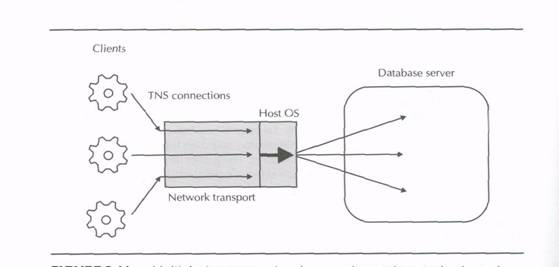
FIGURE 3-11. Multiplexing many network connections into a single physical network transport reduces the operating system overheadThe objective of multiplexing is to reduce the operating system overhead (on the host computer} that is necessary to support many network connections. By concentrating many network connections into a single network transport, you reduce the number of processes and open network sockets needed on the server computer to support large user populations.
The TNS Listener
A TNS listener is necessary to establish TNS network connections. A TNS listener is a process that receives the connection request of an initiator, resolves the given address to the network address of the destination, and establishes a TNS connection to the destination. For example, when you start an application and request a connection to the database named ORACLE, your connection request is forwarded to the network's TNS listener, which then resolves the address of ORACLE to the computer that is running an instance for the associated database. The TNS listener then requests the instance to establish a TNS connection between your client application and the instance's multithreaded server configuration (or a dedicated server).TNS Addressing
All computer networks use an addressing scheme that uniquely identifies the location of each computer and service on the network. Network configuration files typically establish network names that users can use to identify specific services on the network. For example, on a TCP/IP computer, there is typically a small file called Hosts that identifies the IP addresses of computers that are accessible on the network. On Windows NT, the Hosts file is usually found in the C:\Winnt\ system32\drivers\etc folder, and looks similar to the following:# Copyright (c) 1993-1995 Microsoft Corp.
#
# This is a sample HOSTS file used by Microsoft TCP/IP for Windows NT.
#
# This file contains the mappings of IP addresses to host names. Each
# entry should be kept on an individual line. The IP address should
# be placed in the first column followed by the corresponding host
# name. The IP address and the host name should be separated by at
# least one space.
#
# Additionally, comments (such as these) may be inserted on individual
# lines or following the machine name denoted by a '#' symbol.
#
# For example:
#
# 102.54.94.97 rhino.acme.com # source server
# 38.25.63.10 x.acme.com # x client host
127.0.0.1 localhost
12 8.126.50.100 alitestl.animatedlearning.com alitestlTNS Configuration Files
Oracle TNS networks also require address mappings that describe where TNS services can be found on the network, such as TNS listeners and Oracle database servers. One way to accomplish TNS addressing is to create and distribute TNS configuration files to each client and server in the network. Then, when a client initiates a TNS connection, it can use the local copy of the appropriate configuration file to resolve the TNS service address.
When your network uses configuration files to set up a TNS network, the most common TNS configuration files that you will have are as follows:
Filename Description
tnsnames.ora The tnsnames.ora configuration file resides on both clients and
servers in an Oracle network. tnsnames.ora contains address
information that Net8 running on a client or server uses to
establish connections with other Oracle services in a network.sqlnet.ora The sqlnet.ora configuration file resides on both clients and
serves in an Oracle network. sql.ora contains special configuration
parameters that configure a connection from a client or server to
another Oracle service ina network.listener.ora The listner.ora configuration file resides only on servers that run a
TNS listener process. listener.ora configures one or more TNS
listener processes. The file describes the names, addresses and
databases that correspond to one or more listener process.When using Oracle for Windows NT, the default directory location for all TNS configuration files is
drive::\Oracle\Ora81\Network\Admin
where drive is the disk drive designation that you chose for your Oracle installation.
Oracle Names
Configuring and maintaining large Oracle networks can be a challenging administrative task. When you use TNS configuration files for network addressing, each client and server must have the most recent copy of the configuration files or else applications might not work properly. Distributing files to the nodes in the system can be particularly difficult when the network contains hundreds or thousands of clients that need access to network services. Putting configuration files in a shared, central network location does not work well, because the files become hot spots that can create bottlenecks.
To solve many network management problems in an Oracle network, you can employ an optional TNS service component called Oracle Names. Oracle Names is nameserver_software that an Oracle client/server system can use to centrally manage network names and corresponding addresses. Rather than use configuration files, a client contacts an Oracle Names server to resolve the address to a network service in the Oracle network. The Oracle Names server replies with the network address of the requested service, which the client then uses to establish a connection with the service. You can start redundant Oracle Names servers in the same network to distribute loads and prevent single points of failure from making the network unavailable. And, if the network changes in some way, all that's necessary is a quick change to the names servers in the system, and all clients will see new address information automatically.Configuring Net8
Net8 configuration is accomplished using the Net8 Assistant and the Net8 Configuration Assistant, two simple utilities that make it easy to create and maintain Oracle networks. Fortunately, the OracleSi installer automatically installs and configures Net8, including a TNS listener service and the necessary TNS configuration files that facilitate access to the starter database. The following exercises show you how to use the Net8 Assistant to investigate the configuration of your system.EXERCISE 3.12: Starting the Net8 Assistant
In this exercise, you'll learn how to examine your current Net8 configuration using the Net8 Assistant. To start the Net8 Assistant, complete the following steps:1. Establish a Windows NT session using an account that is a member of the Administrators group.
2. Click the Start button on the Windows NT taskbar.
3. Click Programs.
4. Click Oracle -Ora81Home.
5. Click Network Administration.
6. Click Net8 Assistant.Figure 3-12 shows the Net8 Assistant. The Net8 Assistant is a dual-paned window that you can use to display the properties of the components in your network. The left pane is an expandable tree of folders. When you select a specific component, the right pane of the Net8 Assistant window shows a property sheet with one or more pages.

FIGURE 3-12. The Net8 AssistantThe four components that you can configure in an Oracle network using the Net8 Assistant are the following:
Profiles
Network service names
TNS listeners
Oracle Names serversThe following exercises will teach you more about these components.
EXERCISE 3.13: Exploring a Profile
In the context of Nets, a profile is a set of preferences that you can use to configure how clients and servers use Net8. The Net8 Assistant stores the preferences that you set for a profile in the sqlnet.ora configuration file.
To display the properties of the current profile, click the Profile icon in the network tree of Net8 Assistant. Figure 3-13 shows the Naming properties of the current profile, specifically the methods that Net8 uses to resolve connection requests to network services.
Notice that in the Selected Methods list, the profile is configured to resolve network connection requests in the following order:1. Resolve a name using TNSNAMESthe local tnsnames.ora configuration file.
2. If the name cannot be resolved using TNSNAMES, resolve the name using ONAMESan Oracle Names server.
3. If the name cannot be resolved using TNSNAMES or ONAMES, resolve a host name using HOSTNAMEa TCP/IP address translation mechanism, such as a Hosts file.
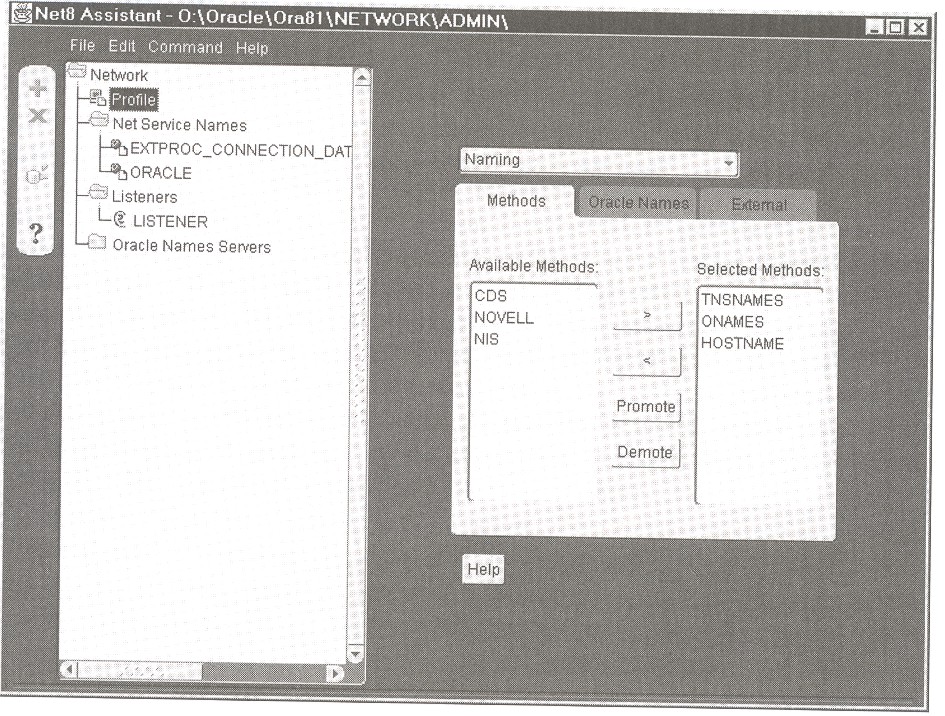
FIGURE 3-13. Use Net8 Assistant to display and edit the properties of a profile
Feel free to examine the other properties of your default Net8 profile and use the tool's Help system to learn more about various preferences that you can enable and configure.
EXERCISE 3.14: Examining Existing Network Services
To display the names and properties of network services currently in your network, open the Net Service Names folder in the Net8 Assistant, and then click a specific service name. Figure 3-12 shows the properties of the ORACLE database service that was automatically configured by the installer for the starter database, in this example, notice that the service's network protocol is TCP/IP, the name of the host server computer is alitest!, the port number is 1521, and the service name is oracle.animatedlearning.com.
When you add or delete a network service, or modify an existing network service using the Net8 Assistant, the tool saves your changes in the tnsnames.ora configuration file.TIP
Before you make any changes to your network services, you might want to create a backup of the existing tnsnames.ora configuration filethe Net8 Assistant does not ask you to confirm changes before overwriting the existing tnsnames.ora file.EXERCISE 3.15: Displaying the Listener's Properties
To display the properties of the network addresses for your network's TNS listener, open the Listeners folder in the Nets Assistant, and then click on a specific listener.
Figure 3-14 shows the properties of an address of the default listener named LISTENER that was automatically configured by the installer. In this example, notice that the address is specifically for Net8 Clients that want to establish TCP/IP connections.
When you add or delete an address for a listener, or modify an existing listener address using the NetS Assistant, the tool saves your changes in the listener.ora configuration file.EXERCISE 3.16: Starting and Stopping the Listener
The Oracle installer automatically configures the default listener for your Oracle system as a Windows NT service. You can check the status of the TNS listener by completing the steps in Exercise 3.1 .The name of the service that corresponds to the default TNS listener should be similar to OracleOraHome81TNSListener, as seen previously in Figure 3-2.
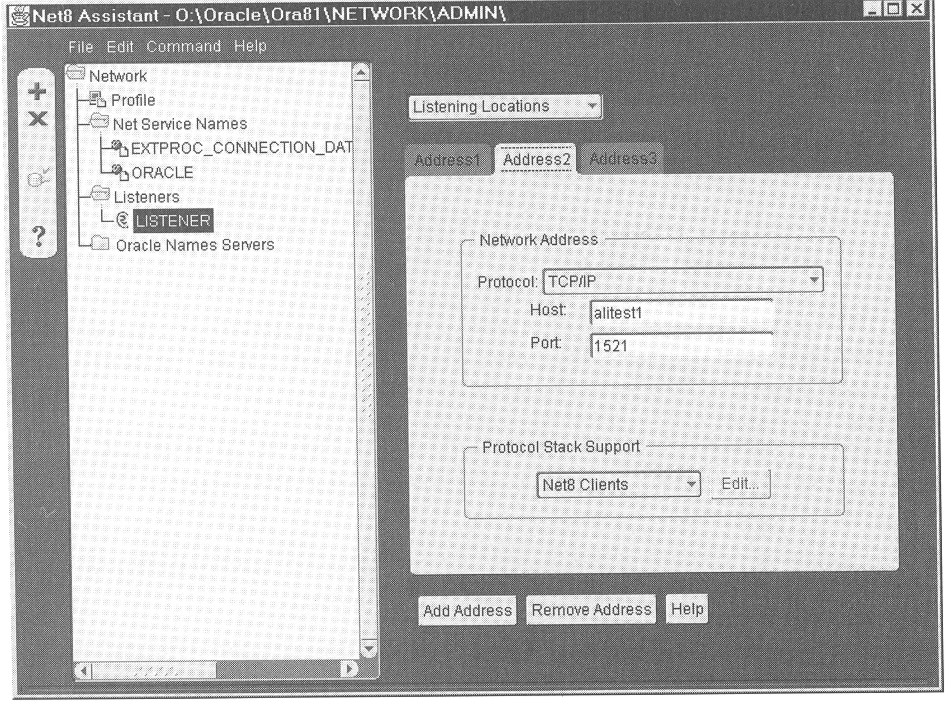
FIGURE 3-14. The properties of a TNS listener address
The installer configures the listener to automatically start when Windows NT starts. You can adjust this configuration option, as well as start and stop the listener on demand by using steps similar to those in Exercises 3.2 and 3.3however, select the listener service rather than the database service.
NOTE
You can also control the listener using a command line utility called the Listener Control utility (lsnrctl.exe), which is found in the Bin directory of your Oracle home location. This utility displays a simple command prompt that accepts commands such as START, STOP, and STATUS to start, stop, and check the current status of a TNS listener. To display a list of Help topics after starting the Listener Control utility, enter the HELP command.This concludes your preliminary investigation of the default Nets configuration for your starter database. Should you ever need to update the Net8 configuration for your system, you can use the Net8 Assistant. To complete this exercise, exit the Net8 Assistant without saving any changes.
Chapter Summary
This chapter has explained several of the software components that you will configure and work with when you use Oracle. An Oracle instance is a set of operating system threads (or processes) and memory structures that, once started, provide for application access to a database.
H Oracle uses a number of background server threads (for example, DBWR, LGWR, ARCH, CKPT, SMON, and PMON) to perform specialized internal functions.
Oracle can use either dedicated or multithreaded server configurations to support user connections to a database instance.
When an Oracle database server must support user connections across a network, clients and servers in the system must run Net8, Oracle's networking software.
To configure Net8, you can use the graphical administration tools Net8 Assistant and Nets Configuration Assistant.